5. Lagopus software switch on KVM Virtual Machine
This section describes:
- How to install Lagopus on KVM-based virtual machine.
- Example configuration to run Lagopus software switch as Layer 2 switch using Ryu as an OpenFlow controller.
- Lagopus with raw-socket mode will be used.
5.1. Software Versions
- Lagopus software switch: Lagopus software switch 0.2.10
- OS: Linux Ubuntu Server 14.04.3 LTS
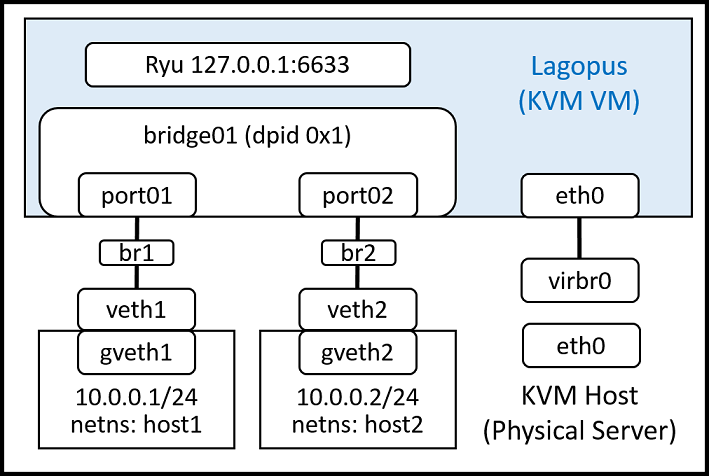
5.2. Overall topology and client host setup
In this example, we will connect two client hosts to Lagopus software switch bridge ports.
- KVM VM running Lagopus software switch, client hosts, and bridges to connect them are all created on KVM host.
- Client hosts are created using network namespace (netns) for simplicity.
- You can also create and use KVM VM as client host instead of netns.
5.3. Setup client hosts and bridges on KVM host
edit
/etc/network/interfacesto setup vethpair, netns and bridge.reboot to apply the changes you just made.
Note
sudo /etc/init.d/networking restartdoes not work on Ubuntu 14.04.$ sudo vi /etc/network/interfaces $ cat /etc/network/interfaces auto veth1 iface veth1 inet manual pre-up ip link add veth1 type veth peer name gveth1 pre-up ip netns add host1 pre-up ip link set gveth1 netns host1 pre-up ip netns exec host1 ip link set gveth1 up pre-up ip netns exec host1 ip addr add 10.0.0.1/24 brd + dev gveth1 post-down ip link del veth1 auto veth2 iface veth2 inet manual pre-up ip link add veth2 type veth peer name gveth2 pre-up ip netns add host2 pre-up ip link set gveth2 netns host2 pre-up ip netns exec host2 ip link set gveth2 up pre-up ip netns exec host2 ip addr add 10.0.0.2/24 brd + dev gveth2 post-down ip link del veth2 auto br1 br2 iface br1 inet manual bridge_ports veth1 iface br2 inet manual bridge_ports veth2
Confirm bridges are created and interfaces are connected.
$ brctl show
bridge name     bridge id               STP enabled     interfaces
br1             8000.a2b53bff4545       no              veth1
br2             8000.fe7797ec6779       no              veth2
virbr0          8000.000000000000       yes
Confirm IP address is correctly configured on client hosts (gveth1/gveth2).
$ sudo ip netns exec host1 ip a
1: lo: <LOOPBACK> mtu 65536 qdisc noop state DOWN group default
    link/loopback 00:00:00:00:00:00 brd 00:00:00:00:00:00
9: gveth1@if10: <NO-CARRIER,BROADCAST,MULTICAST,UP> mtu 1500 qdisc pfifo_fast state LOWERLAYERDOWN group default qlen 1000
    link/ether c2:5f:77:74:3e:97 brd ff:ff:ff:ff:ff:ff
    inet 10.0.0.1/24 brd 10.0.0.255 scope global gveth1
       valid_lft forever preferred_lft forever

$ sudo ip netns exec host2 ip a
1: lo: <LOOPBACK> mtu 65536 qdisc noop state DOWN group default
    link/loopback 00:00:00:00:00:00 brd 00:00:00:00:00:00
11: gveth2@if12: <NO-CARRIER,BROADCAST,MULTICAST,UP> mtu 1500 qdisc pfifo_fast state LOWERLAYERDOWN group default qlen 1000
    link/ether ca:6a:eb:34:3c:f0 brd ff:ff:ff:ff:ff:ff
    inet 10.0.0.2/24 brd 10.0.0.255 scope global gveth2
       valid_lft forever preferred_lft forever
5.4. KVM installation and VM creation (Ubuntu)
Details about installing and running KVM on Ubuntu, refer to ubuntu documentation: KVM/Installation .
5.4.1. KVM installation
KVM requires CPU supporting Intel VT or AMD-V. Confirm it with below command.
It’s supported if result was 1 or more. Not supported if 0 (zero).
$ egrep -c '(vmx|svm)' /proc/cpuinfo
4
$
Install necessary packages. (listed below)
reboot and log in.
Check installation was completed using
virshandlsmod.$ sudo apt-get update $ sudo apt-get install qemu-kvm libvirt-bin ubuntu-vm-builder bridge-utils virtinst $ sudo reboot ... after reboot and log in... $ virsh version Compiled against library: libvirt 1.2.2 Using library: libvirt 1.2.2 Using API: QEMU 1.2.2 Running hypervisor: QEMU 2.0.0 $ lsmod | grep kvm kvm_intel 163840 0 kvm 507904 1 kvm_intel
5.4.2. VM creation using virt-install
There are two different options to create VM on headless server, virt-install and vmbuilder. The difference is vmbuilder is for creating Ubuntu-based guests, whereas virt-install lets you install other kinds of operationg systems, which are other Linux distributions and other OS like Windows, FreeBSD etc.
Note
There used to be a command called “Ubuntu-vm-builder”, which is now a wrapper to vmbuilder. It’s now only maintained for compatibility wih previous scripts, thus recommend using vmbuilder.
Download ISO image of Ubuntu Server. (in
~/img)$ mkdir ~/img $ cd ~/img ~/img$ wget http://ftp.riken.jp/Linux/ubuntu-releases/14.04.4/ubuntu-14.04.3-server-amd64.iso
Create VM (use
--dry-runto check without actually creating VM)$ sudo virt-install \ --name lagopus \ --ram 4096 \ --disk path=/var/lib/libvirt/images/lagopus.img,size=30 \ --vcpus 2 \ --cpu host \ --os-type linux \ --os-variant ubuntutrusty \ --virt-type=kvm \ --noautoconsole \ -c ~/img/ubuntu-14.04.3-server-amd64.iso \ --graphics vnc,listen=0.0.0.0,password=vnc Starting install... Allocating 'lagopus.img' | 30 GB 00:00 Creating domain... | 0 B 00:00 Domain installation still in progress. You can reconnect to the console to complete the installation process. (Confirm VM was created successfully) $ virsh list Id Name State ---------------------------------------------------- 4 lagopus running
Continue OS (Ubuntu) installation on the VM.
- Check vnc display number assigned to the newly created VM.
- Connect to the VM via VNC. <kvm-host-ip>:<vnc-display>
$ virsh vncdisplay lagopus
:0
# VNC display number is "0" for above case.
# Continue installation by connecting via VNC.
Start VM after OS installation.
VM will shut down after installing OS and would not start automatically by default.
Note
Hostname of the VM was set as lagopus-kvm in this example.
$ virsh list --all
 Id    Name                           State
----------------------------------------------------
 -     lagopus                        shut off

$ virsh start lagopus
Domain lagopus started

$ virsh list --all
 Id    Name                           State
----------------------------------------------------
 4     lagopus                        running
5.4.3. Connecting to VM via SSH from KVM host (Usermode Networking)
By default, VM will have interface automatically connected to a bridge created local to KVM host. (ex: “virbr0”)
This is called “Usermode Networking”, where you can:
Access external network from VM via host (NAT).
Connect to VM from host via SSH.
To connect to VM from host via SSH:
Connect to VM via VNC and confirm IP address assigned to it.
$ ssh <VM-usermode-interface-ip>from KVM host.
5.4.4. Adding network interface to VM
Confirm existing network interfaces on VM (named “lagopus”).
$ virsh domiflist lagopus
Interface  Type       Source     Model       MAC
-------------------------------------------------------
-          network    default    virtio      52:54:00:6a:f2:f8
Add two interfaces to VM. (use different MAC address)
Script to generate MAC address.
$ vi genmac.sh
#!/bin/bash
# generate a random mac address for the qemu nic
printf '52:54:00:%02x:%02x:%02x\n' $((RANDOM%256)) $((RANDOM%256)) $((RANDOM%256))

example:
$ ./genmac.sh
52:54:00:f0:bd:b1
virsh command to add interfaces to VM.
$ virsh attach-interface --domain lagopus --type bridge \
        --source br1 --model virtio \
        --mac 52:54:00:f0:bd:b1 --config --live
Interface attached successfully
$ virsh attach-interface --domain lagopus --type bridge \
        --source br2 --model virtio \
        --mac 52:54:00:0f:69:9c --config --live
Interface attached successfully
Options:
--domain name of the VM you wan to add interface
--source bridge on KVM host to connect the interface
--type type of interface: network, bridge
--model NIC model: virtio, e1000 etc.
--mac MAC address of the interface
--config flag to make it persistant after VM reboot
--live flag to apply change immediately on a running VM
Confirm interfaces are created and connected to bridge “br1” and “br2”.
$ virsh domiflist lagopus
Interface  Type       Source     Model       MAC
-------------------------------------------------------
vnet0      network    default    virtio      52:54:00:6a:f2:f8
vnet1      bridge     br1        virtio      52:54:00:f0:bd:b1
vnet2      bridge     br2        virtio      52:54:00:0f:69:9c

$ brctl show
bridge name     bridge id               STP enabled     interfaces
br1             8000.a2b53bff4545       no              veth1
                                                        vnet1
br2             8000.fe54000f699c       no              veth2
                                                        vnet2
virbr0          8000.fe54006af2f8       yes             vnet0
Connect to VM (via SSH)
Confirm two interfaces (eth1/eth2) were added.
$ ssh <vm-ip-address>
<usr>@<vm-ip-address>'s password:

lagopus-kvm:~$ ip a
1: lo: <LOOPBACK,UP,LOWER_UP> mtu 65536 qdisc noqueue state UNKNOWN group default
    link/loopback 00:00:00:00:00:00 brd 00:00:00:00:00:00
    inet 127.0.0.1/8 scope host lo
       valid_lft forever preferred_lft forever
    inet6 ::1/128 scope host
       valid_lft forever preferred_lft forever
2: eth0: <BROADCAST,MULTICAST,UP,LOWER_UP> mtu 1500 qdisc pfifo_fast state UP group default qlen 1000
    link/ether 52:54:00:6a:f2:f8 brd ff:ff:ff:ff:ff:ff
    inet 192.168.122.224/24 brd 192.168.122.255 scope global eth0
       valid_lft forever preferred_lft forever
    inet6 fe80::5054:ff:fe6a:f2f8/64 scope link
       valid_lft forever preferred_lft forever
3: eth1: <BROADCAST,MULTICAST> mtu 1500 qdisc noop state DOWN group default qlen 1000
    link/ether 52:54:00:f0:bd:b1 brd ff:ff:ff:ff:ff:ff
4: eth2: <BROADCAST,MULTICAST> mtu 1500 qdisc noop state DOWN group default qlen 1000
    link/ether 52:54:00:0f:69:9c brd ff:ff:ff:ff:ff:ff

lagopus-kvm:~$ ethtool -i eth1
driver: virtio_net
version: 1.0.0
firmware-version:
bus-info: 0000:00:06.0
supports-statistics: no
supports-test: no
supports-eeprom-access: no
supports-register-dump: no
supports-priv-flags: no
Make newly added interface (eth1/eth2) permanetly up during boot.
Note
you don’t need to assign IP address to Lagopus ports.
lagopus-kvm:~$ sudo vi /etc/network/interfaces
# add below lines
auto eth1
iface eth1 inet manual
  up ip link set eth1 up
  down ip link set eth1 down

auto eth2
iface eth2 inet manual
  up ip link set eth2 up
  down ip link set eth2 down
reboot or manually apply setting by
ifupcommand.Note
sudo /etc/init.d/networking restartdoes not work on Ubuntu 14.04.lagopus-kvm:~$ sudo ifup eth1 lagopus-kvm:~$ sudo ifup eth2
5.5. Lagopus installation steps on KVM VM
Proceed following steps inside the VM.
Note
all operations in this section are done INSIDE the VM
5.5.1. Installing Lagopus to VM (raw socket)
Install necessary packages. (described below)
lagopus-kvm:~$ sudo apt-get install build-essential libexpat-dev libgmp-dev \
    libssl-dev libpcap-dev byacc flex git \
    python-dev python-pastedeploy python-paste python-twisted
Download Lagopus software switch source code.
lagopus-kvm:~$ git clone -b v0.2.10 --recursive https://github.com/lagopus/lagopus.gitCompile and install Lagopus software switch with raw-socket mode
lagopus-kvm:~$ ./configure --disable-dpdk
lagopus-kvm:~$ make
lagopus-kvm:~$ sudo make install
5.5.2. Setup Lagopus configuration
Copy sample configuration file under
/usr/local/etc/lagopus/.lagopus-kvm:~$ sudo mkdir /usr/local/etc/lagopus/ lagopus-kvm:~$ cd ~/lagopus lagopus-kvm:~$ sudo cp misc/examples/lagopus.dsl /usr/local/etc/lagopus/lagopus.dsl
Edit
lagopus.dsl* Example:- One OpenFlow controller: “127.0.0.1”
eth0: Management interface. (Thus does not appear in the configuration)eth1,eth2are used as Lagopus dataplane port. These two port are accessed with raw-socket mode.
lagopus-kvm:~$ sudo vi /usr/local/etc/lagopus/lagopus.dsl
channel channel01 create -dst-addr 127.0.0.1 -protocol tcp
controller controller01 create -channel channel01 -role equal -connection-type main
interface interface01 create -type ethernet-rawsock -device eth1
interface interface02 create -type ethernet-rawsock -device eth2
port port01 create -interface interface01
port port02 create -interface interface02
bridge bridge01 create -controller controller01 -port port01 1 -port port02 2 -dpid 0x1
bridge bridge01 enable
lagopus-kvm:~$
Run Lagopus software switch
Confirm two interfaces are recognized.
lagopus-kvm:~$ sudo lagopus
lagopus-kvm:~$ lagosh
Lagosh> show version
{
    "product-name": "Lagopus",
    "version": "0.2.2-release"
}
Lagosh>
Lagosh> show interface
[
    {
        "name": "interface01",
        "rx-dropped": 0,
        "is-enabled": true,
        "tx-errors": 0,
        "rx-bytes": 0,
        "tx-packets": 0,
        "rx-packets": 0,
        "tx-bytes": 0,
        "rx-errors": 0,
        "tx-dropped": 0
    },
    {
        "name": "interface02",
        "rx-dropped": 0,
        "is-enabled": true,
        "tx-errors": 0,
        "rx-bytes": 0,
        "tx-packets": 0,
        "rx-packets": 0,
        "tx-bytes": 0,
        "rx-errors": 0,
        "tx-dropped": 0
    }
]
Stop Lagopus software switch and exit lagosh.
Lagosh> stop
Lagosh> exit
lagopus-kvm:~$
5.6. Building Layer 2 switch using Ryu as an OpenFlow controller
5.6.1. Setup Ryu Simple switch
Install necessary packages.
Use pip command and install Ryu.
lagopus-kvm:~$ sudo apt-get install python-setuptools python-pip python-dev \
  libxml2-dev libxslt-dev
lagopus-kvm:~$ sudo pip install ryu
Run below only if required.
lagopus-kvm:~$ sudo pip install oslo.config
lagopus-kvm:~$ sudo pip install six --upgrade
Run simple_switch Ryu application.
lagopus-kvm:~$ ryu-manager --verbose /usr/local/lib/python2.7/dist-packages/ryu/app/simple_switch_13.pyOpen new SSH connection and run Lagopus software switch.
lagopus-kvm:~$ sudo lagopusConfirm Lagopus is connected to Ryu from ryu-manager console log.
connected socket:<eventlet.greenio.base.GreenSocket object at 0x7f9c71c1bb50> address:('127.0.0.1', 35705)
hello ev <ryu.controller.ofp_event.EventOFPHello object at 0x7f9c71bad1d0>
move onto config mode
EVENT ofp_event->SimpleSwitch13 EventOFPSwitchFeatures
switch features ev version=0x4,msg_type=0x6,msg_len=0x20,xid=0xb0597afd,OFPSwitchFeatures(auxiliary_id=0,capabilities=79,datapath_id=1,n_buffers=65535,n_tables=255)
move onto main mode
5.6.2. Confirm ping works via Lagopus software switch
On KVM host, ping between namespace host1/host2.
$ sudo ip netns exec host1 ping 10.0.0.2
PING 10.0.0.2 (10.0.0.2) 56(84) bytes of data.
64 bytes from 10.0.0.2: icmp_seq=1 ttl=64 time=11.5 ms
64 bytes from 10.0.0.2: icmp_seq=2 ttl=64 time=0.745 ms
...
$ sudo ip netns exec host2 ping 10.0.0.1
PING 10.0.0.1 (10.0.0.1) 56(84) bytes of data.
64 bytes from 10.0.0.1: icmp_seq=1 ttl=64 time=0.770 ms
64 bytes from 10.0.0.1: icmp_seq=2 ttl=64 time=0.798 ms
...